
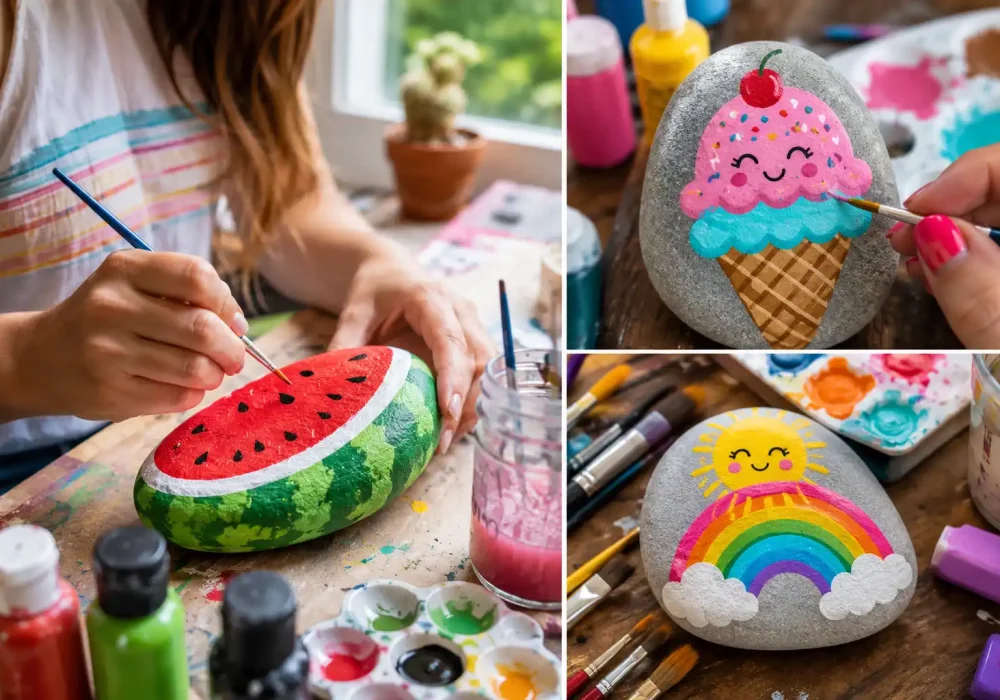
Summer is the perfect time to pick up a paintbrush and turn simple rocks into colorful little works of art. You don’t need advanced skills or complicated supplies to get started.
From cheerful watermelon slices and sunny rainbows to cute ice cream and tropical flowers, these projects are designed to be fun without feeling overwhelming. Each idea brings its own playful summer personality.
Whether you’re painting with kids, spending a quiet afternoon at home, or simply looking for a creative weekend project, there’s plenty here to try. Grab some smooth rocks, your favorite acrylic paints, and let’s get started.
Bright Rock Painting Ideas to Make This Summer
These 16 ideas cover a mix of colorful fruits, summer treats, beach-inspired designs, flowers, and cheerful patterns. They’re simple enough for beginners while still looking polished and eye-catching when finished.
Also read: 12 Gorgeous Living Room Paint Colors for an Upscale Look
Also Read: 13 Paint Colors for Bedrooms That Create a Luxe Retreat
1. Paint a Cheerful Rainbow Sunshine Rock
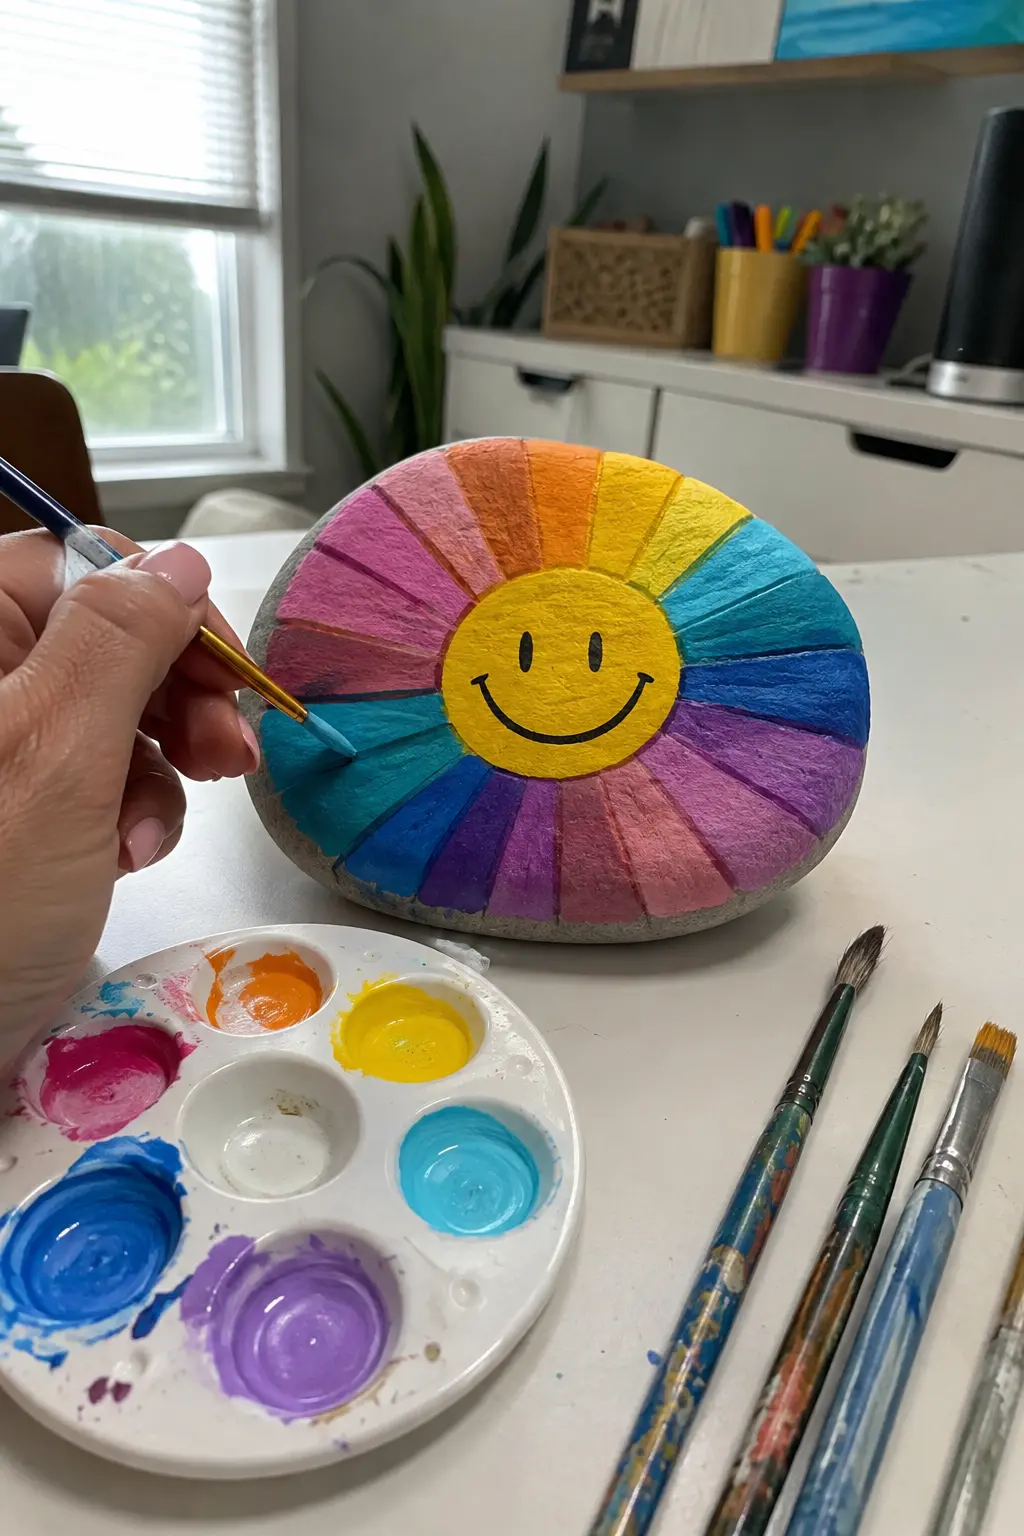
A rainbow sunshine rock is a bright and playful project that can instantly bring a little summer energy to your space. This design uses colorful sections around a cheerful yellow sun, creating a simple pattern that looks much more detailed than it actually is. It’s a great choice when you want something colorful without needing advanced painting skills.
Start by painting the center of the rock yellow and let it dry completely. Then divide the area around it into curved sections and fill each one with a different bright shade, such as pink, orange, yellow, turquoise, blue, and purple. Once the colors are dry, use a thin black brush to add the simple smiling face and define the sections.
The best part about this idea is that you can easily change the color combination to match your own style. Use warmer shades for a sunny look, or mix bright cool and warm colors for a rainbow effect. A naturally rounded, wide rock works especially well because it gives the colorful rays plenty of room to spread around the center.
Pro Tip: Paint the colorful sections in thin layers and let each color dry before adding the outlines. This keeps the colors crisp and prevents them from blending into one another.
2. Turn a Smooth Stone Into a Tropical Pineapple
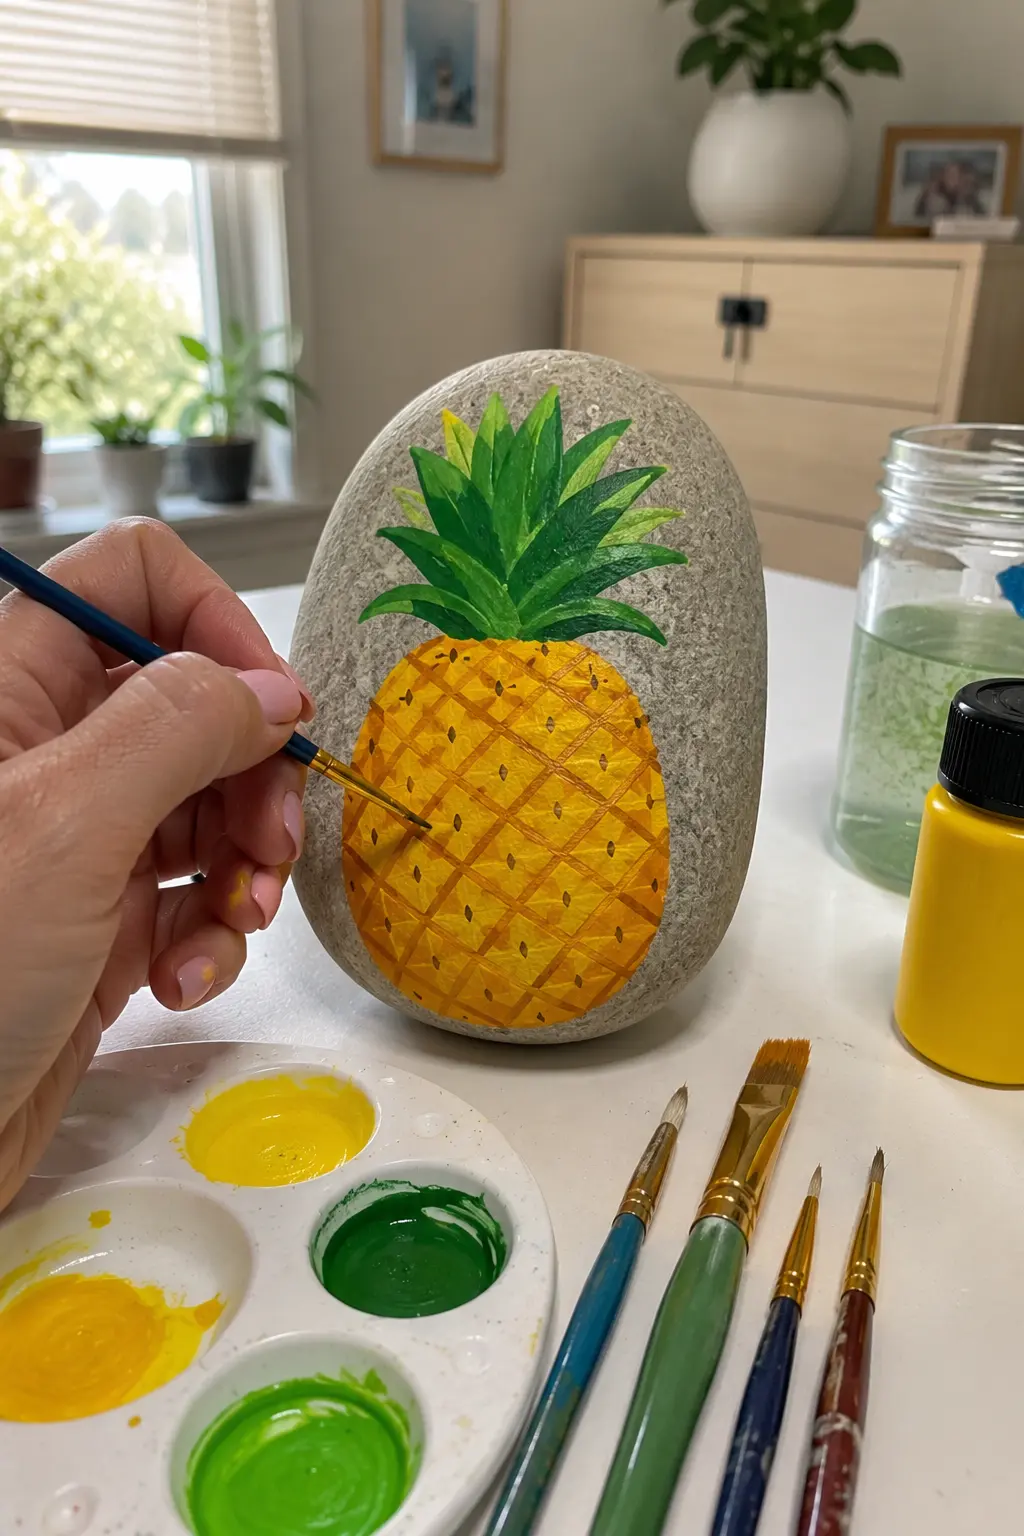
A pineapple rock brings a bright tropical feel to this summer painting collection without being difficult to recreate. The design uses a warm golden-yellow body with a simple crisscross pattern and layers of green leaves at the top. A taller, rounded stone works especially well because its natural shape gives the pineapple a realistic upright appearance.
Begin by painting the pineapple body in a rich yellow shade and allow it to dry before adding the details. Use a slightly darker yellow or orange to create the diagonal lines across the fruit, then add small dark seed shapes where the lines meet. For the leaves, layer several shades of green with pointed brushstrokes to create a fuller, more dimensional top.
You don’t have to make every line perfectly straight or every leaf identical. In fact, a little variation makes the finished rock feel genuinely handmade and gives the design more character. Place your painted pineapple on a desk, shelf, windowsill, or summer display where its bright colors can stand out.
Pro Tip: Add a lighter yellow highlight through the center of the pineapple before painting the darker grid lines. It gives the fruit more depth without requiring complicated shading.
3. Recreate a Colorful Beach Ball on a Summer Rock
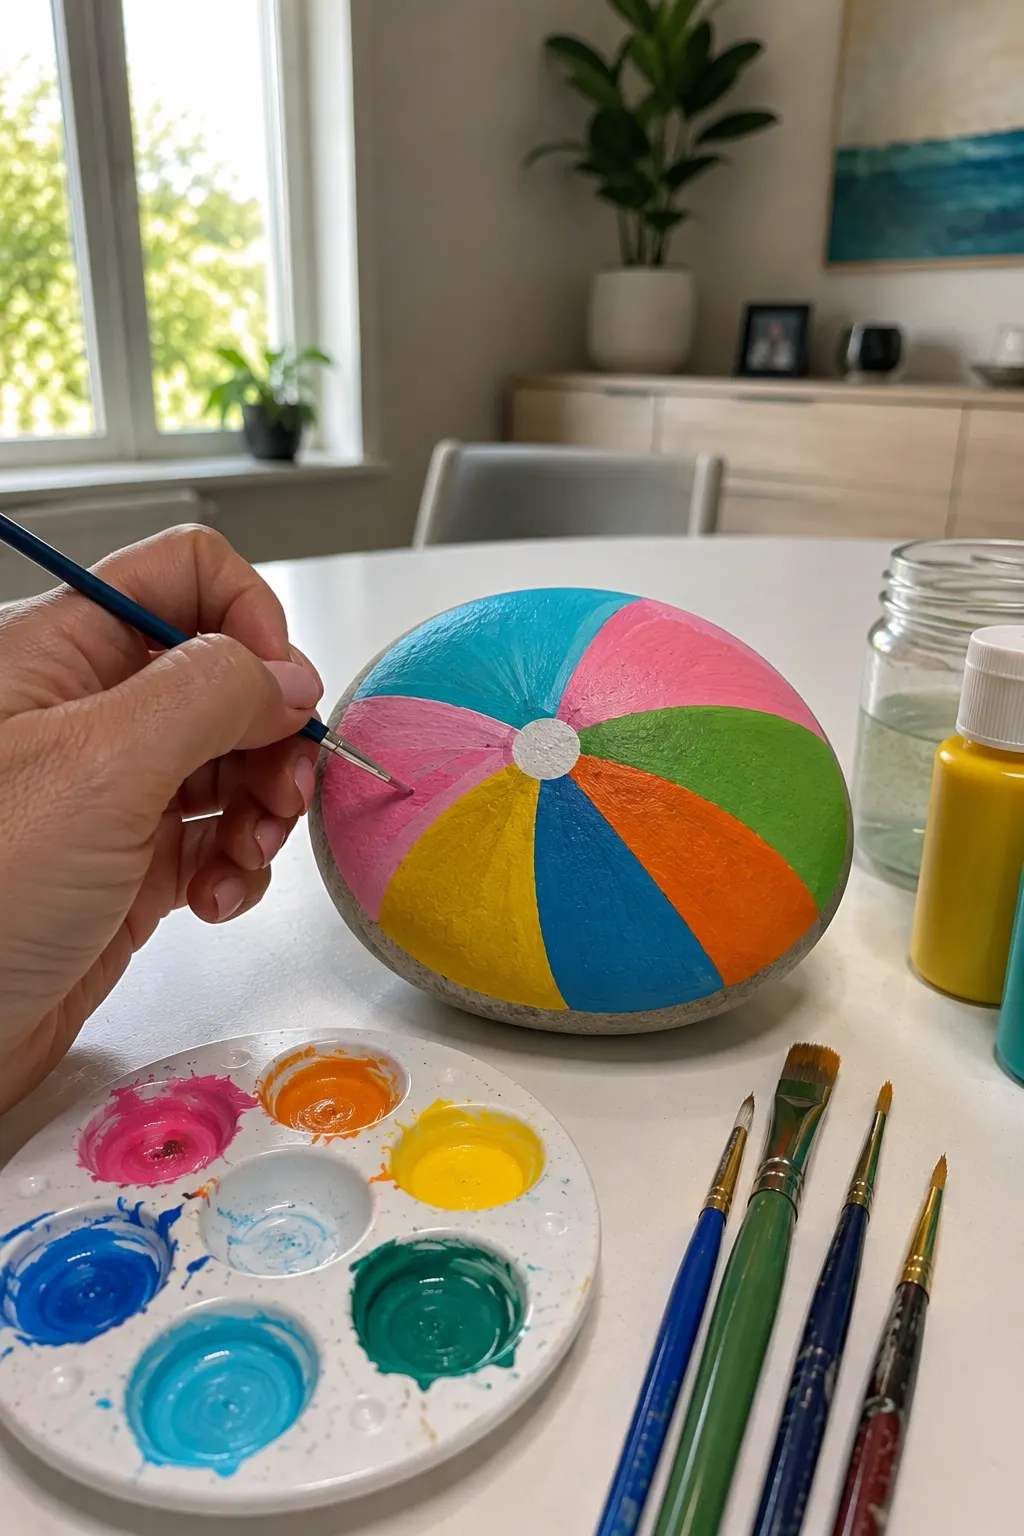
A beach ball design is a fun way to turn a wide, rounded rock into a bright summer accent. The bold sections of turquoise, pink, yellow, orange, blue, and green create an instantly recognizable pattern that feels playful and energetic. Because the design relies mostly on large color blocks, it’s also approachable for beginners.
Start by choosing a naturally rounded rock with enough surface area for the sections to spread across. Paint the center with a small white circle, then divide the surrounding surface into curved sections using different bright colors. Once the base colors have dried, clean up the borders with a fine brush so each section stays sharp and distinct.
You can make this idea as colorful or as simple as you like. A classic mix of primary colors gives it a traditional beach-ball look, while pink, turquoise, lavender, and coral can create a more modern version. The finished rock works beautifully as a cheerful summer decoration for a desk, shelf, patio, or windowsill.
Pro Tip: Lightly sketch the curved sections with a pencil before painting. It makes it much easier to keep the beach-ball pattern balanced around the center.
4. Brighten a Smooth Rock With a Cheerful Sunflower
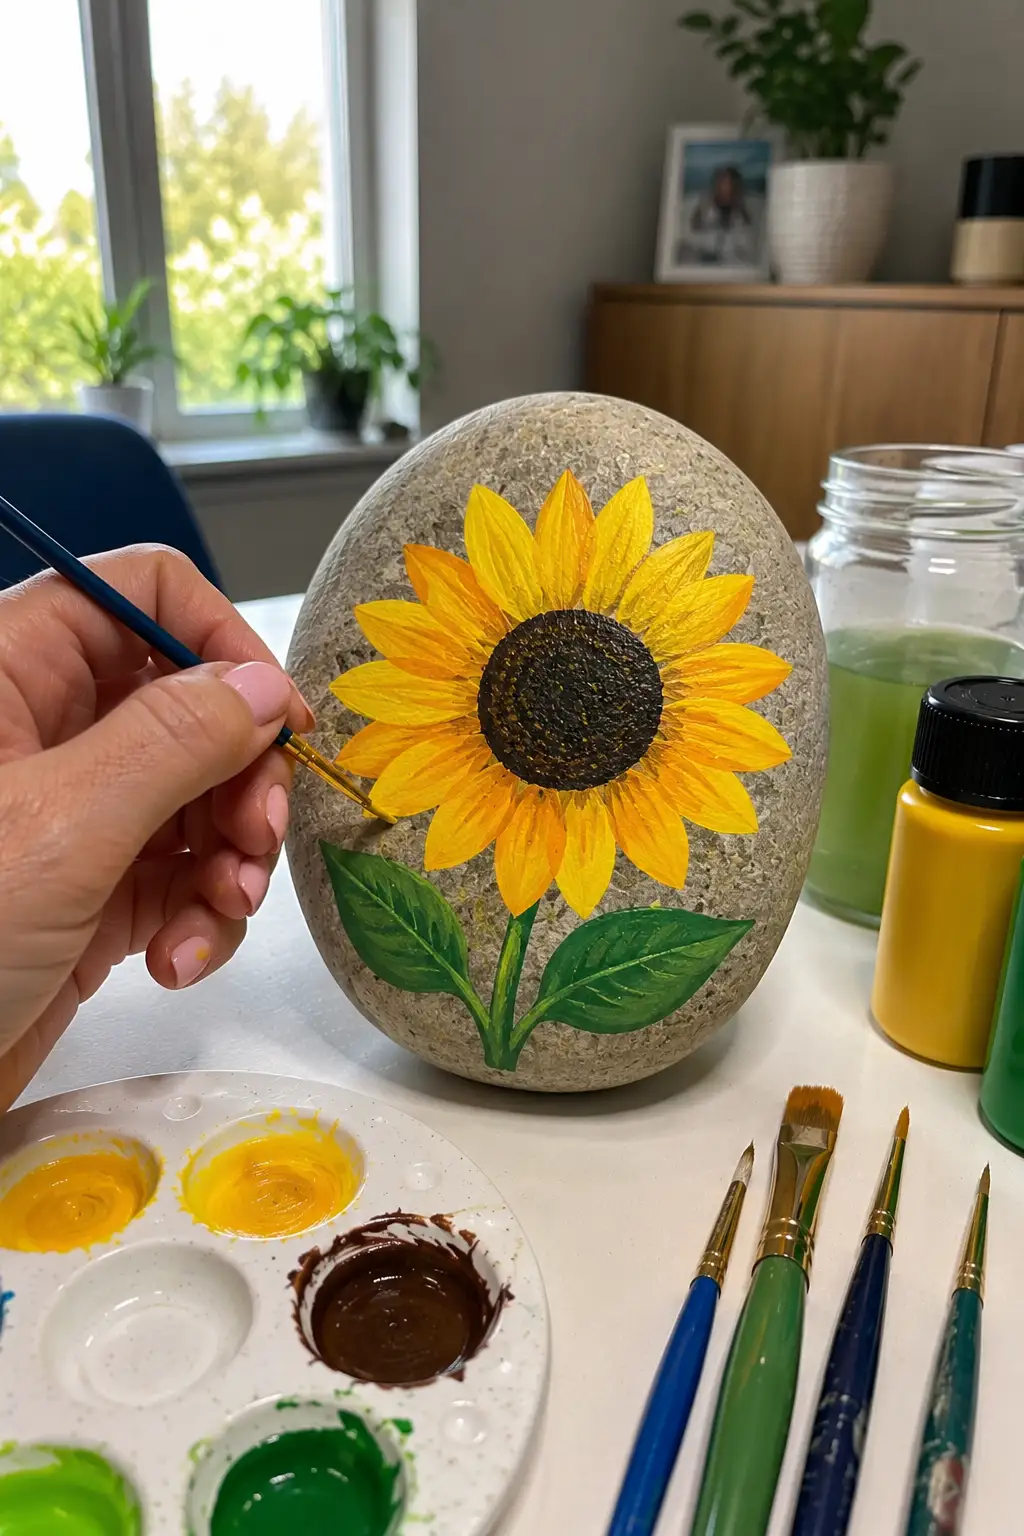
A sunflower rock is a lovely choice when you want a summer design that feels bright, cheerful, and a little more detailed. The large golden petals immediately stand out against the natural stone, while the dark center and green leaves give the design a balanced finish. A tall, rounded rock like this one works particularly well because it gives the flower plenty of space to spread out.
Begin with the sunflower itself, painting the petals in layers of yellow and warm orange. Once the petals are dry, add a dark brown center and use different shades of green for the stem and leaves. You can add a few fine lines inside the petals and leaves to create extra dimension without making the painting too complicated.
Don’t worry about making every petal exactly the same. Slight differences in their size and shape can make the flower look more natural and genuinely handmade. This design can work as a cheerful indoor decoration or as a colorful accent for a covered outdoor space.
Pro Tip: Use two shades of yellow on the petals instead of relying on one flat color. A lighter center and slightly darker outer edges can make the sunflower look much more dimensional.
5. Create a Rolling Ocean Wave on a Summer Rock
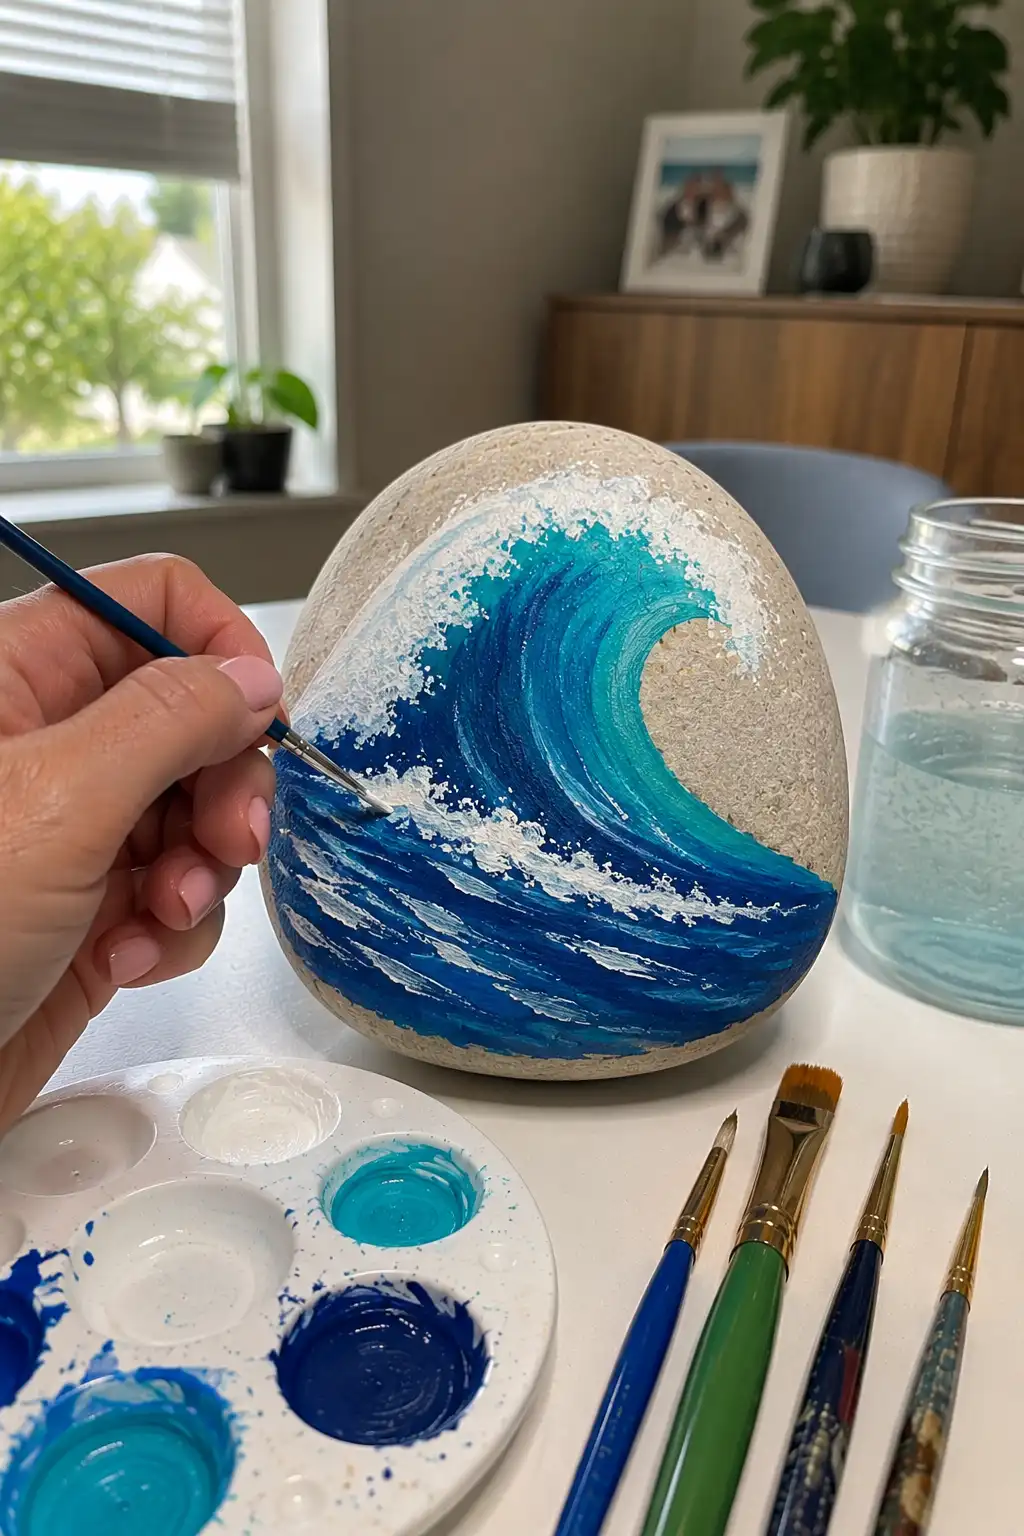
An ocean wave rock brings a fresh, energetic feel to your summer collection with just a few shades of blue and white. The large curling wave creates the main focal point, while the layered water and foam make the design look more detailed than the painting process actually is. A tall, rounded rock gives the wave plenty of room to curve naturally across the surface.
Start with deep blue for the lower water and gradually work in turquoise and lighter blue as you build the curling wave. Use curved brushstrokes that follow the movement of the water rather than painting straight lines. Once the blue layers have dried, add thin white strokes along the wave crest and across the lower water to create the look of moving foam.
This design gives you plenty of freedom to experiment with different shades and brush movements. You can keep the wave bold and graphic for a beginner-friendly project, or add extra layers of white and turquoise if you want a more detailed finish. Display the completed rock somewhere bright where its cool colors can stand out.
Pro Tip: Use a dry brush with only a small amount of white paint to create the foamy texture. Lightly dragging it across the blue surface gives the wave a much more natural finish.
6. Add a Tropical Hibiscus to a Smooth Summer Rock
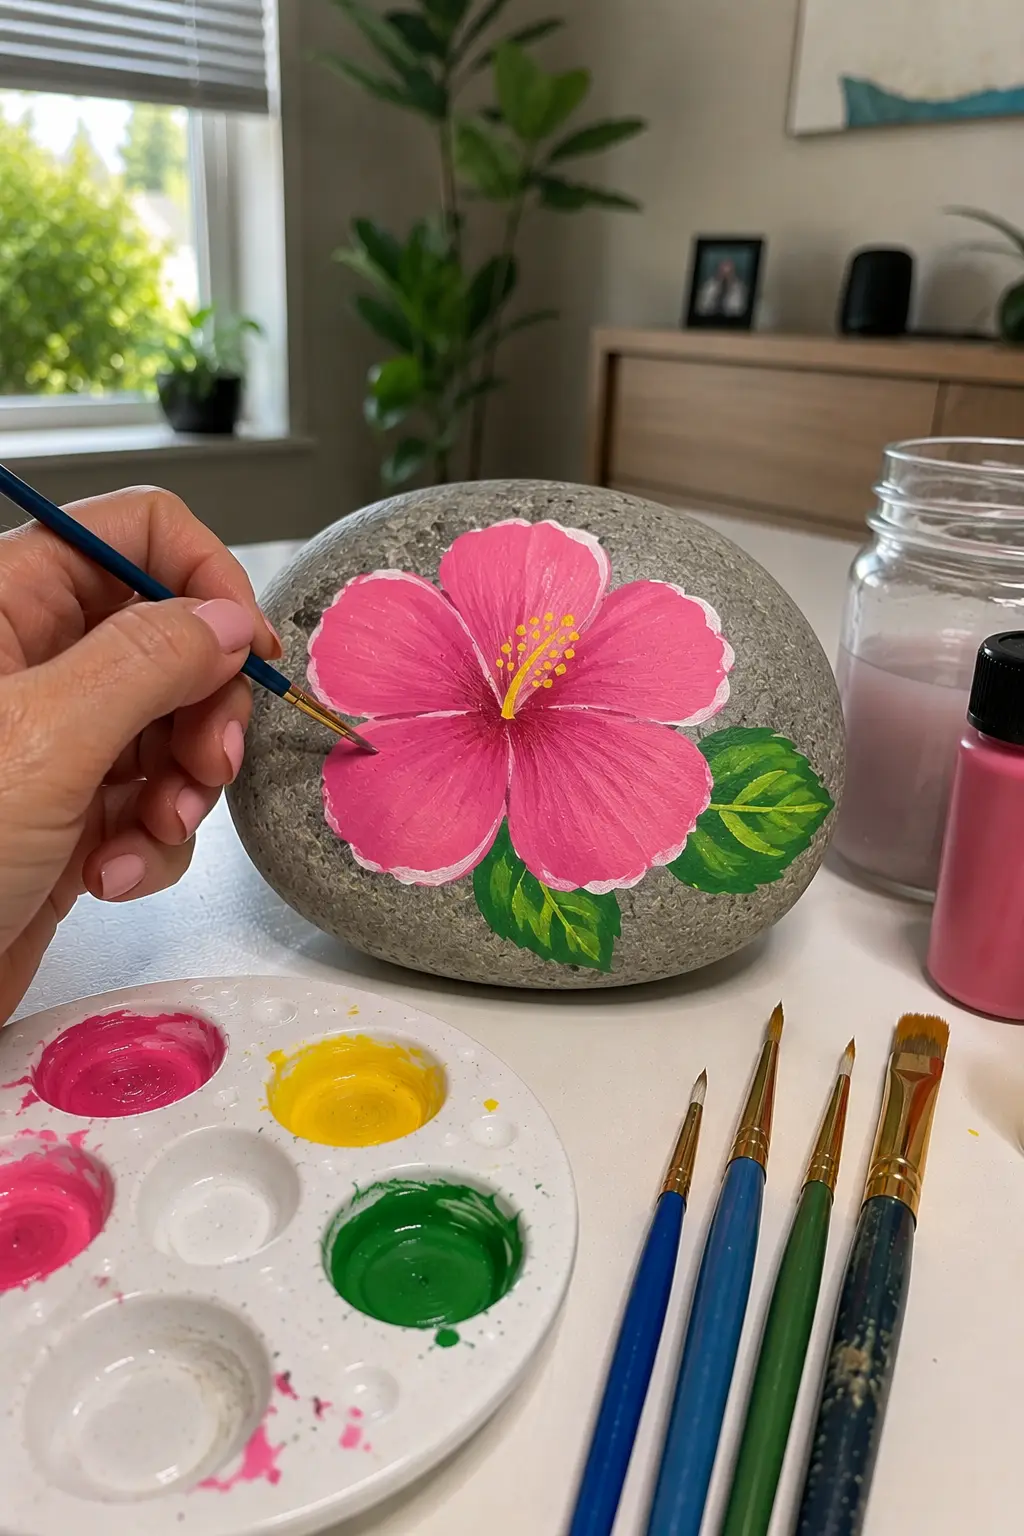
A tropical flower rock is a simple way to bring bold color and a cheerful summer feel to your collection. This design features a large pink hibiscus with a bright yellow center and layered green leaves, creating a striking contrast against the natural stone. A wide, smooth rock is ideal because it gives the flower enough room to spread across the surface.
Start by painting the main petals in a vibrant pink shade, then add a lighter pink along the edges or through the center of each petal for extra dimension. Once the flower is dry, paint the yellow center and delicate details, followed by the green leaves underneath. A few fine lines on the petals and leaves can make the finished design look more detailed without making it difficult.
You can easily change the flower colors to suit your own summer palette. Try coral, orange, purple, or bright red instead of pink, and use two shades of green for the leaves. The finished rock can add a cheerful touch to a desk, shelf, windowsill, or covered outdoor space.
Pro Tip: Use a slightly lighter shade around the outer edge of each petal. This small highlight makes the flower pop against the stone and gives it a more polished painted look.
7. Bring a Rainbow Fish to Life on a Summer Rock
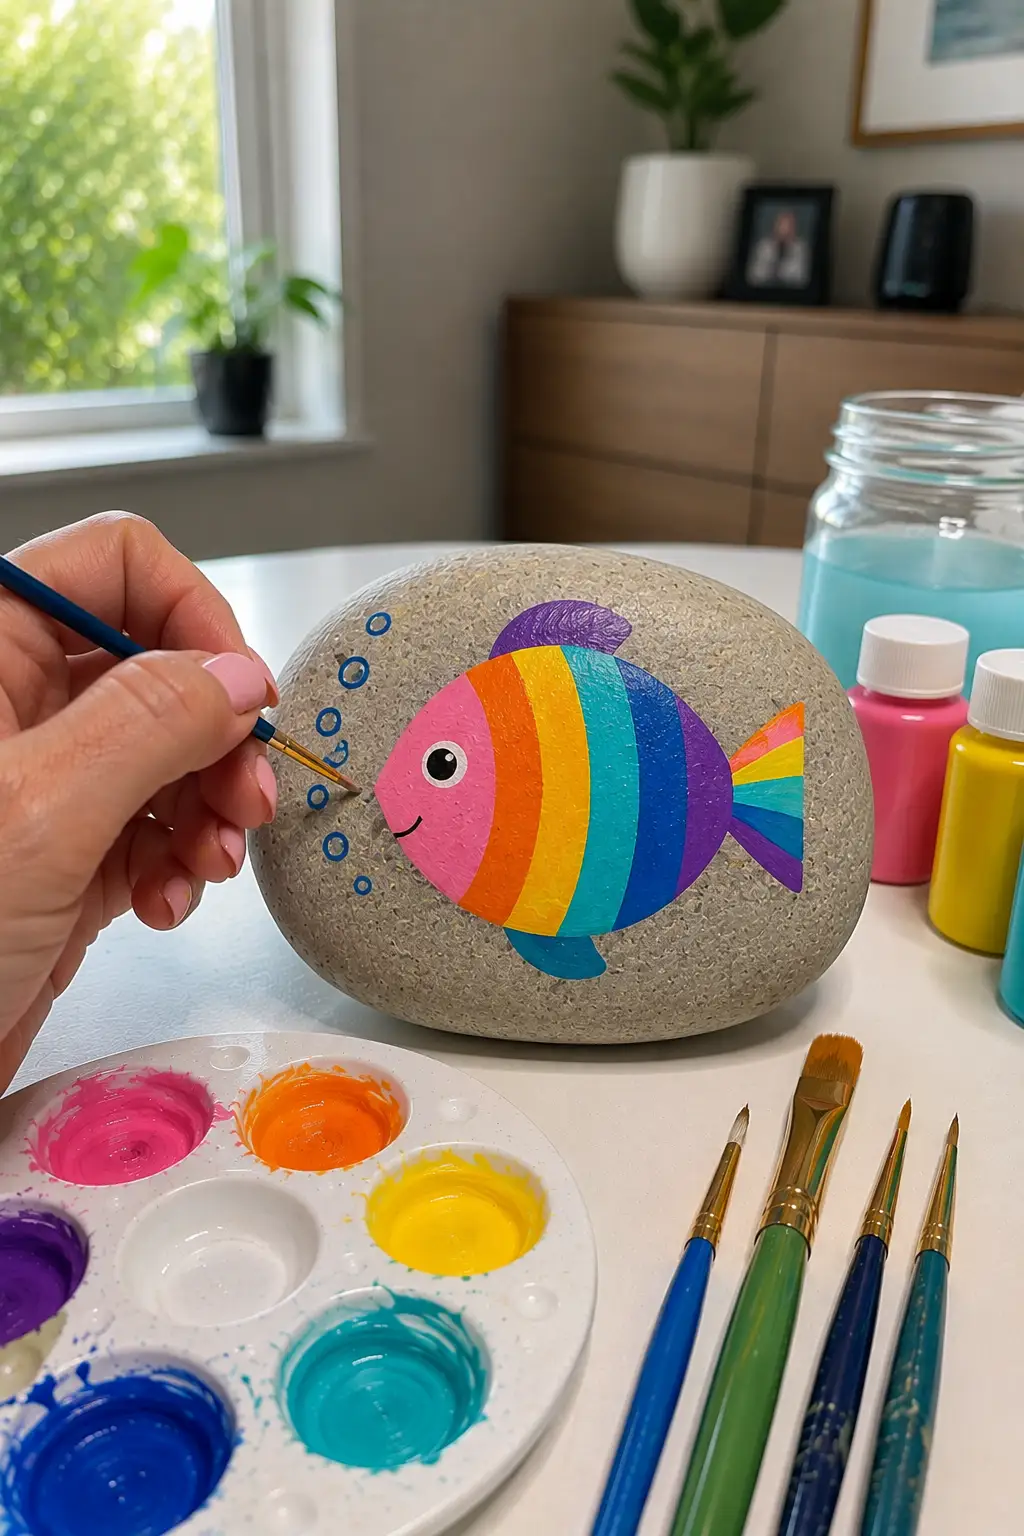
A rainbow fish rock is a playful choice for anyone who wants something colorful and cheerful without getting into complicated details. The design combines bright stripes of pink, orange, yellow, turquoise, blue, and purple with a simple tail and a friendly expression. A wide, smooth rock gives the fish plenty of room to stretch across the surface.
Start by sketching the basic oval body and tail with a light pencil before adding paint. Fill the body with bold vertical or slightly curved color bands, then add the fins and tail using contrasting shades. Once everything is dry, a small black eye, simple smile, and a few blue bubbles can bring the character to life.
The beauty of this idea is how easily you can personalize it. Change the stripe colors, make the fish smaller or larger, or add a few bubbles around it for a more underwater feel. It’s especially fun for a relaxed afternoon of painting because the large color sections don’t require precise artistic skills.
Pro Tip: Paint the lighter colors first, such as yellow and pink, before moving to darker blues and purple. This helps keep the bright shades clean and prevents dark paint from muddying the lighter sections.
8. Turn a Rounded Rock Into a Juicy Watermelon Slice
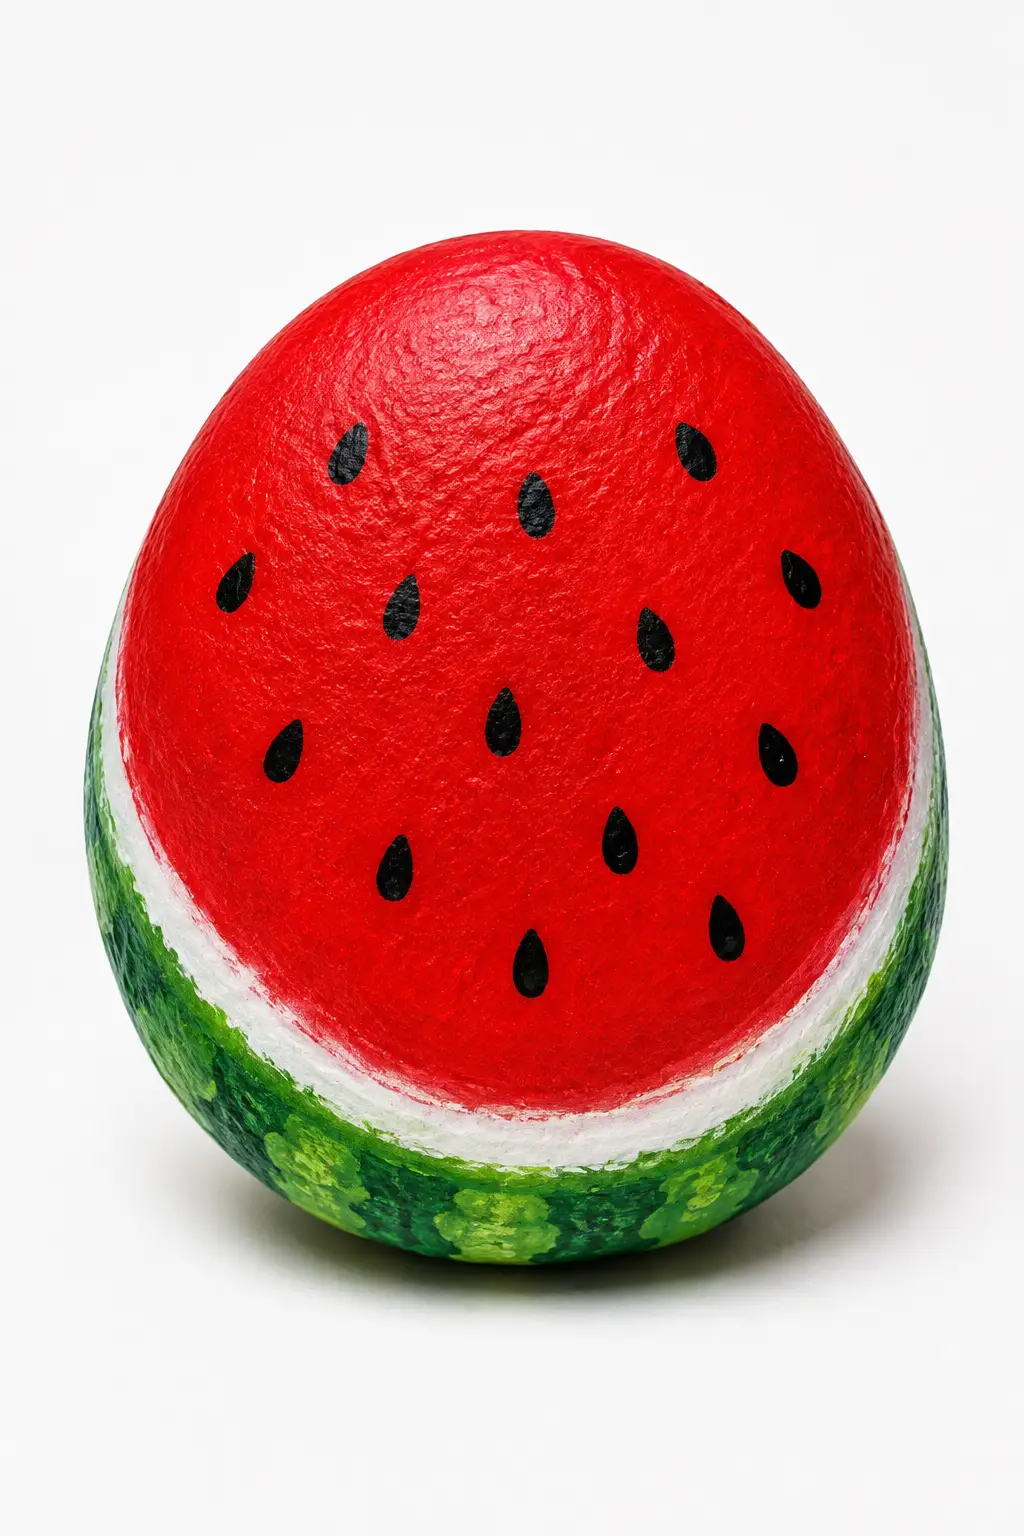
A watermelon rock is one of those summer projects that looks impressive while staying wonderfully simple. The bold red center, bright green rind, and little black seeds create an instantly recognizable design that works beautifully on a rounded stone. It’s especially fun if you want a colorful project that doesn’t require complicated patterns or detailed artwork.
Start by covering the upper portion of the rock with a rich watermelon red, leaving enough space near the bottom for the rind. Add a narrow white band between the red fruit and the green outer edge, then build the rind with two shades of green for a more natural finish. Once everything is completely dry, paint small black seeds across the red section.
You can keep the watermelon design clean and graphic, or add a few lighter red brushstrokes to give the fruit more texture. A smooth oval or round rock is ideal because its natural shape already resembles a watermelon half. The finished piece can add a cheerful pop of color to a shelf, desk, windowsill, or summer craft display.
Pro Tip: Don’t make every seed point in exactly the same direction. Slightly changing their size and angle will make the watermelon look more natural and handmade.
9. Paint a Sweet Ice Cream Cone for a Summer Rock
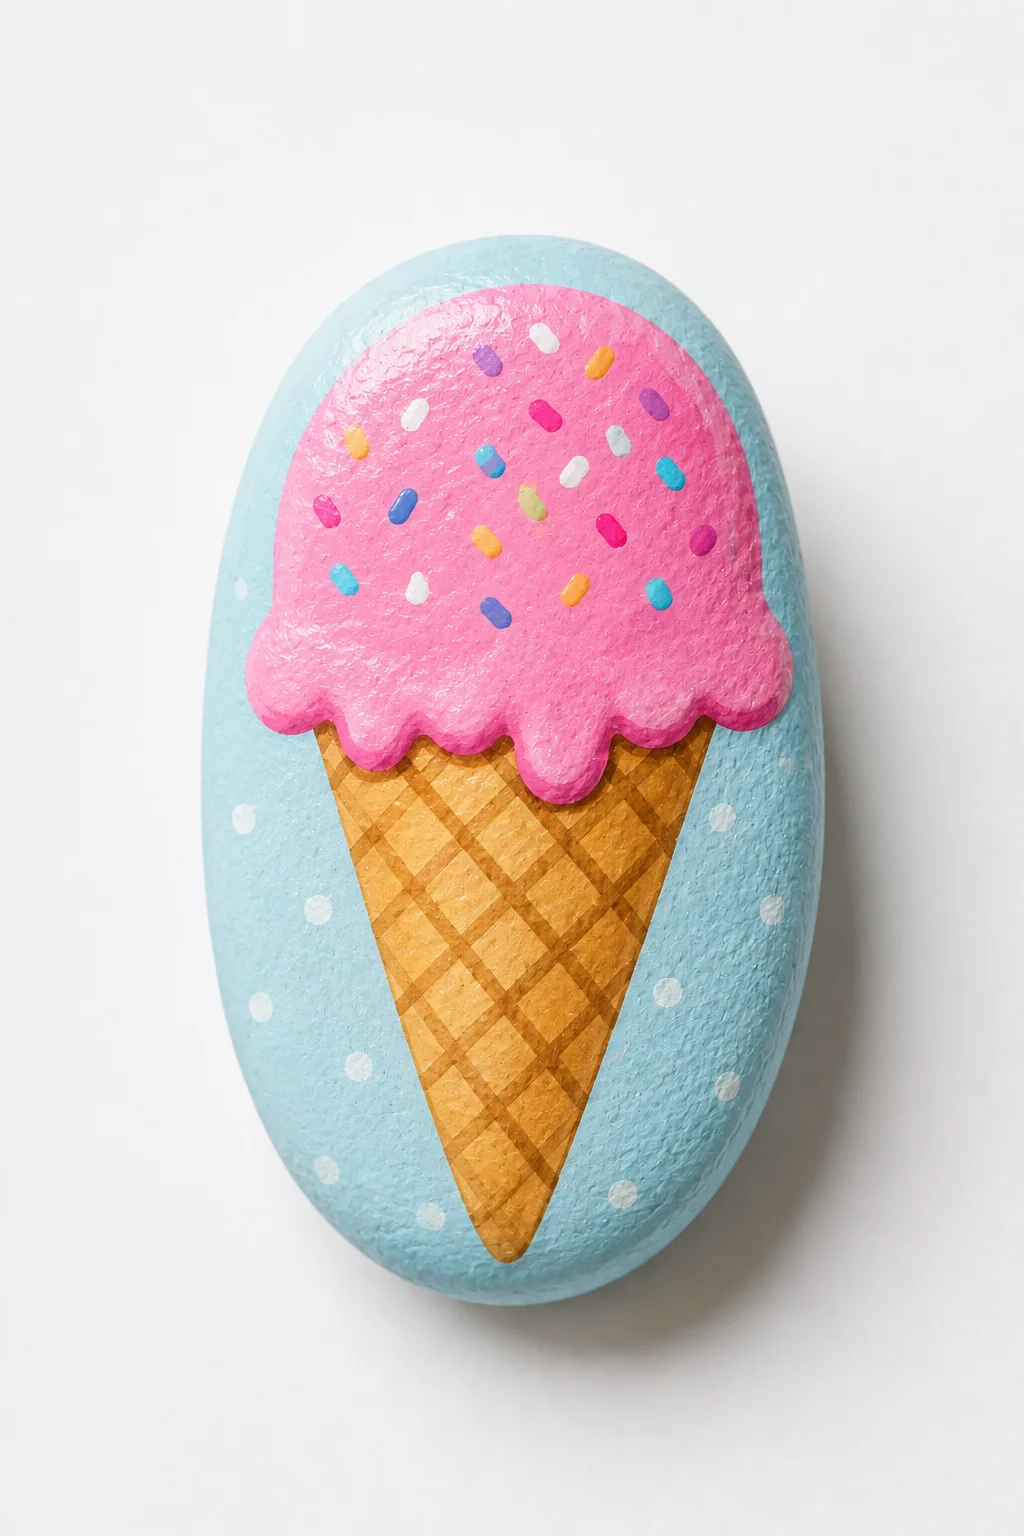
An ice cream cone rock is a playful project that instantly feels like summer. The soft pink scoop, golden waffle cone, colorful sprinkles, and light blue background create a cheerful combination that’s easy to customize. An oval or slightly elongated rock works especially well because it gives the ice cream enough height without requiring a complicated shape.
Start with a light blue base coat to give the design a bright backdrop, then paint the cone in warm golden brown. Add a simple crisscross pattern using a slightly darker shade before painting the rounded scoop of ice cream above it. Finish with colorful sprinkles in pink, purple, yellow, orange, blue, and white for a fun handmade touch.
You can easily switch up the flavor and color combination to make each rock different. Try mint green, lavender, strawberry pink, or even a rainbow scoop instead of the classic pink. The finished rock makes a cheerful little decoration and is simple enough to paint during a relaxed afternoon craft session.
Pro Tip: Paint the cone pattern with a fine brush after the base color has dried completely. Thin diagonal lines will give you a cleaner waffle effect without making the design look overly complicated.
10. Paint Playful Flip-Flops for a Colorful Summer Rock

A flip-flop rock is a fun way to capture that relaxed summer feeling with a design full of bright colors and tiny details. This version uses two colorful sandals with turquoise, pink, orange, and yellow accents, creating a cheerful pattern that really stands out against the natural stone. A wide, flat rock gives you enough room to paint both sandals side by side.
Begin by lightly sketching the two flip-flop shapes so you can position them evenly on the rock. Fill the sandals with your favorite summer colors, then add contrasting straps and simple decorations such as dots, stripes, or tiny flowers. Once the main paint has dried, use a fine brush to sharpen the edges and add the smaller details.
You can make each pair completely different by changing the colors and patterns. Try bright coral and turquoise for a tropical feel, or use pink, purple, and yellow for something more playful. This idea is also a great opportunity to experiment with small decorative details without having to paint a complicated scene.
Pro Tip: Paint the sandal shapes first and save the tiny dots, flowers, and strap details for last. A fine liner brush will give you much better control over those smaller accents.
11. Turn a Simple Stone Into a Fresh Lemon Slice
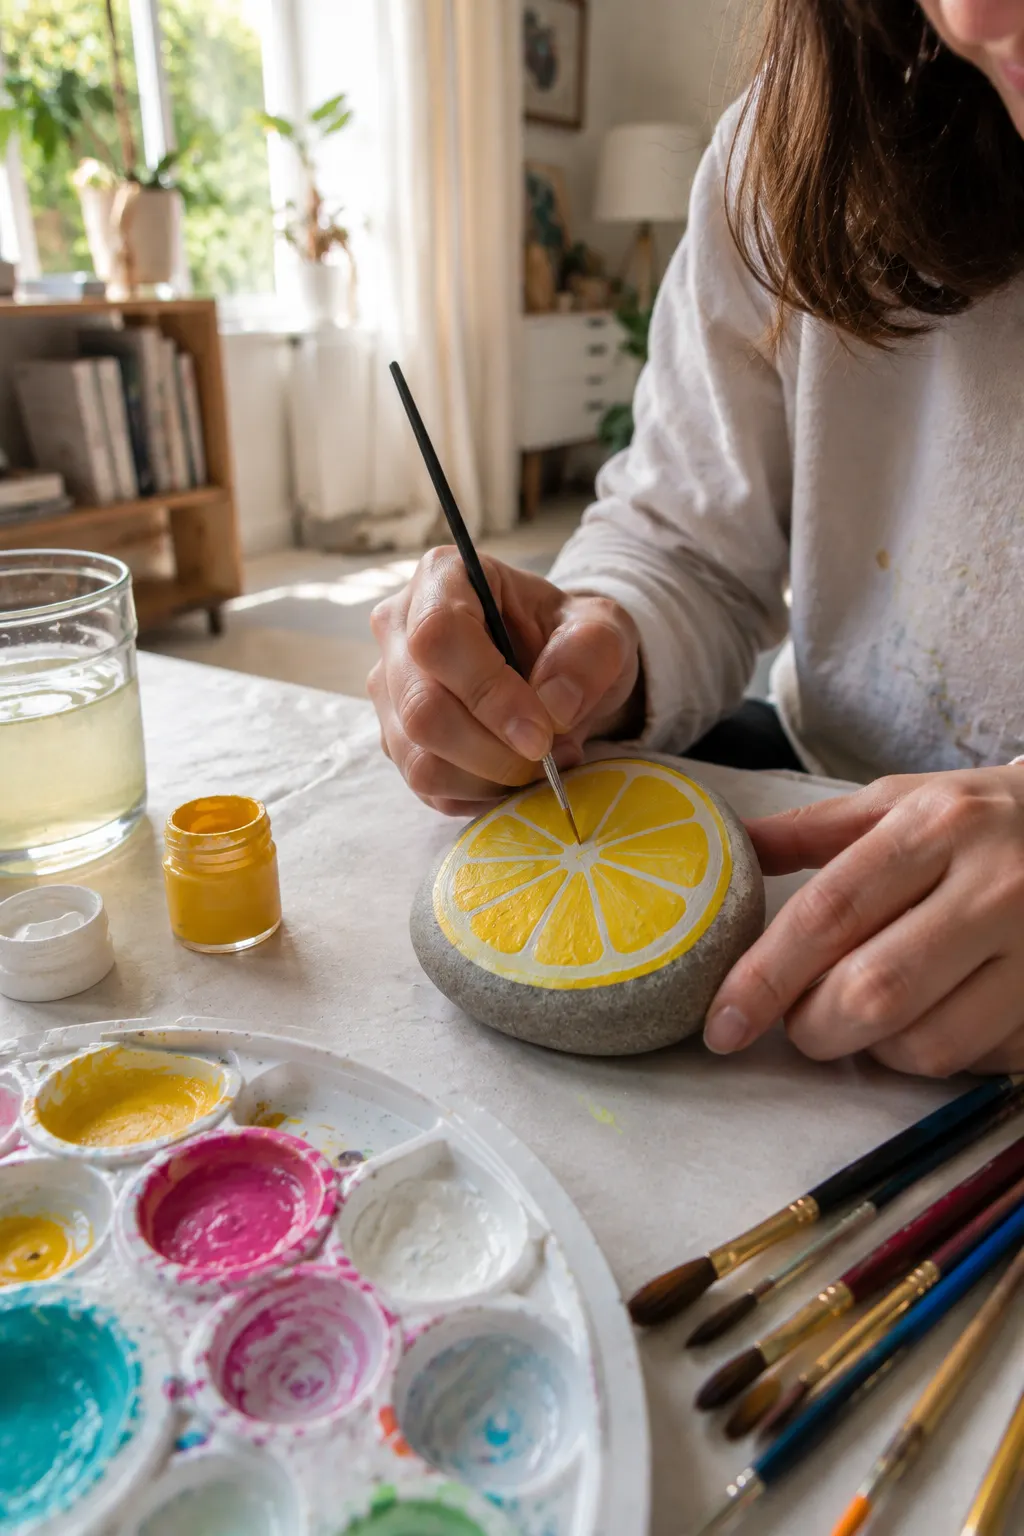
A lemon slice rock is a bright, clean summer project that uses just a few colors to create a surprisingly eye-catching result. The vivid yellow fruit stands out beautifully against the natural gray stone, while the white outline and segment lines make the citrus shape instantly recognizable. A wide, smooth rock is perfect because it gives the slice enough space to spread across the surface.
Start by painting a large yellow circle in the center of the rock and allow it to dry completely. Add a clean white ring around the outside, then divide the center into several curved lemon segments using a fine brush. You can add a slightly darker yellow along the edges of each segment to give the fruit a little more depth.
This idea is easy to personalize, too. Try painting an orange or lime slice using the same basic technique, or combine several citrus designs on different rocks for a colorful collection. The simple shape makes it a great project for beginners who want to practice clean outlines and small details.
Pro Tip: Use a light pencil to mark the lemon segments before applying the white lines. It’ll help you keep the sections evenly spaced and give the finished slice a much cleaner appearance.
12. Give a Smooth Rock a Bold Pair of Summer Sunglasses
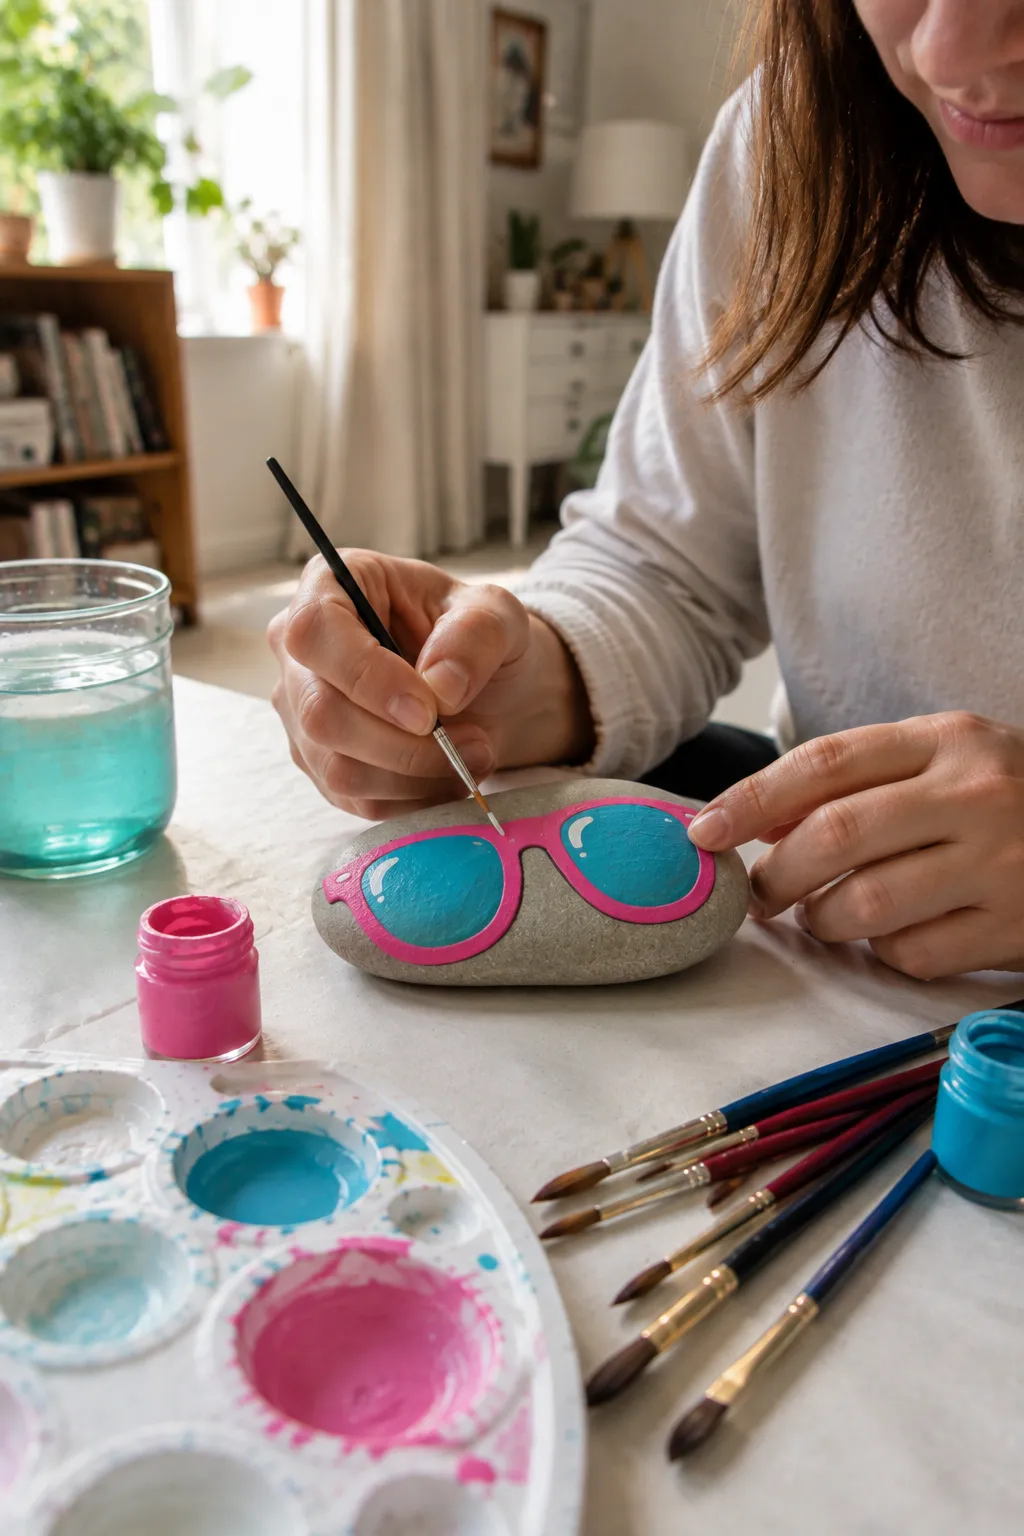
A sunglasses rock is a fun way to turn a simple stone into a playful summer accent. The oversized pink frames and bright turquoise lenses create a bold contrast that immediately catches the eye. A wide, flat rock is ideal for this design because it gives both lenses enough room while keeping the overall shape clean and balanced.
Start by lightly sketching the frame and two rounded lenses before applying your paint. Fill the frames with a bright color such as hot pink, coral, or yellow, then use turquoise or blue for the lenses. Once the main colors are dry, add small white highlights to the lenses to create a glossy, reflective effect.
You can make this idea look completely different just by changing the frame color or adding small decorative details around the glasses. Try yellow frames with blue lenses, purple frames with pink lenses, or even rainbow-colored frames for a more playful version. It’s a simple project that lets you experiment with bold colors without requiring complicated artwork.
Pro Tip: Leave a small unpainted or lighter-colored curve near the top of each lens before adding the final details. That simple highlight makes the sunglasses look shiny and much more polished.
13. Turn a Summer Popsicle Into a Colorful Rock Design
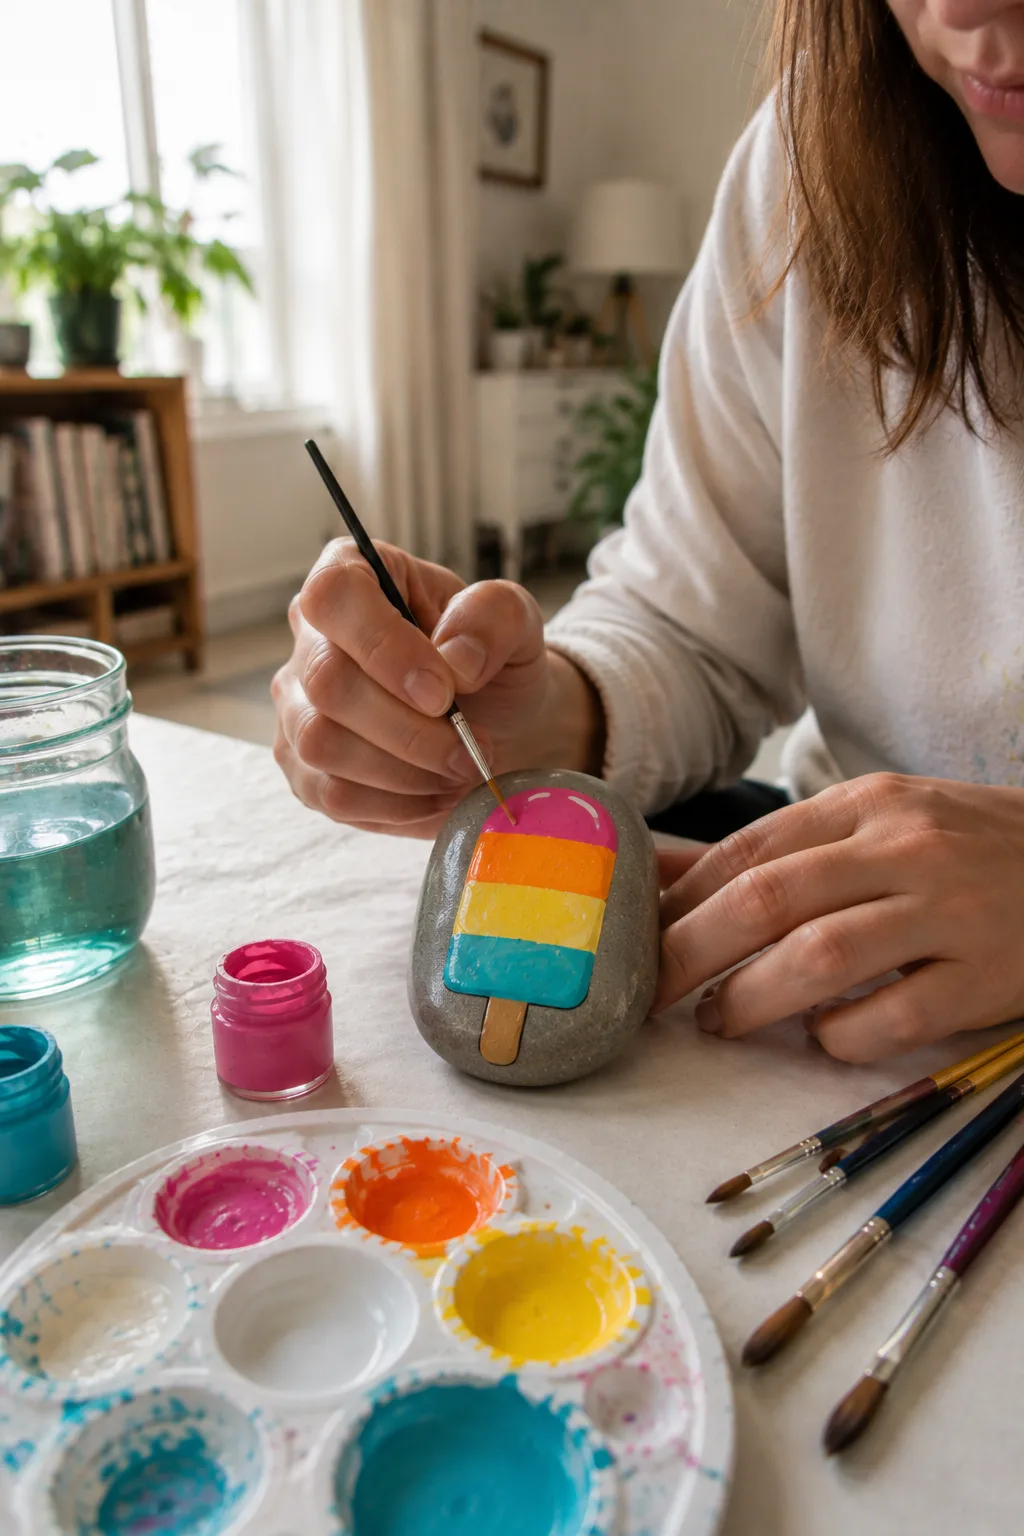
A popsicle rock is a simple summer idea that instantly feels bright, playful, and refreshing. The rounded top and wooden-stick detail make the design easy to recognize, while the colorful horizontal stripes give it plenty of personality. A slightly tall, smooth rock works particularly well because its natural shape already resembles a frozen treat.
Start by sketching the basic popsicle shape on the rock, then paint the sections in bright summer colors such as pink, orange, yellow, and turquoise. Add a warm brown stick at the bottom and use a lighter shade along the edge to create a subtle highlight. Keep the color sections clean and let each layer dry before adding the next one.
You can easily create different popsicle flavors by changing the colors and patterns. Try strawberry pink with white accents, tropical orange and yellow, or a cool combination of turquoise and purple. A few tiny highlights along the top can make the painted treat look glossy and give the finished rock a more polished appearance.
Pro Tip: Leave a narrow lighter highlight along one side of the popsicle instead of outlining the entire shape. It creates a subtle dimensional effect while keeping the design simple for beginners.
14. Paint a Colorful Collection of Seashells
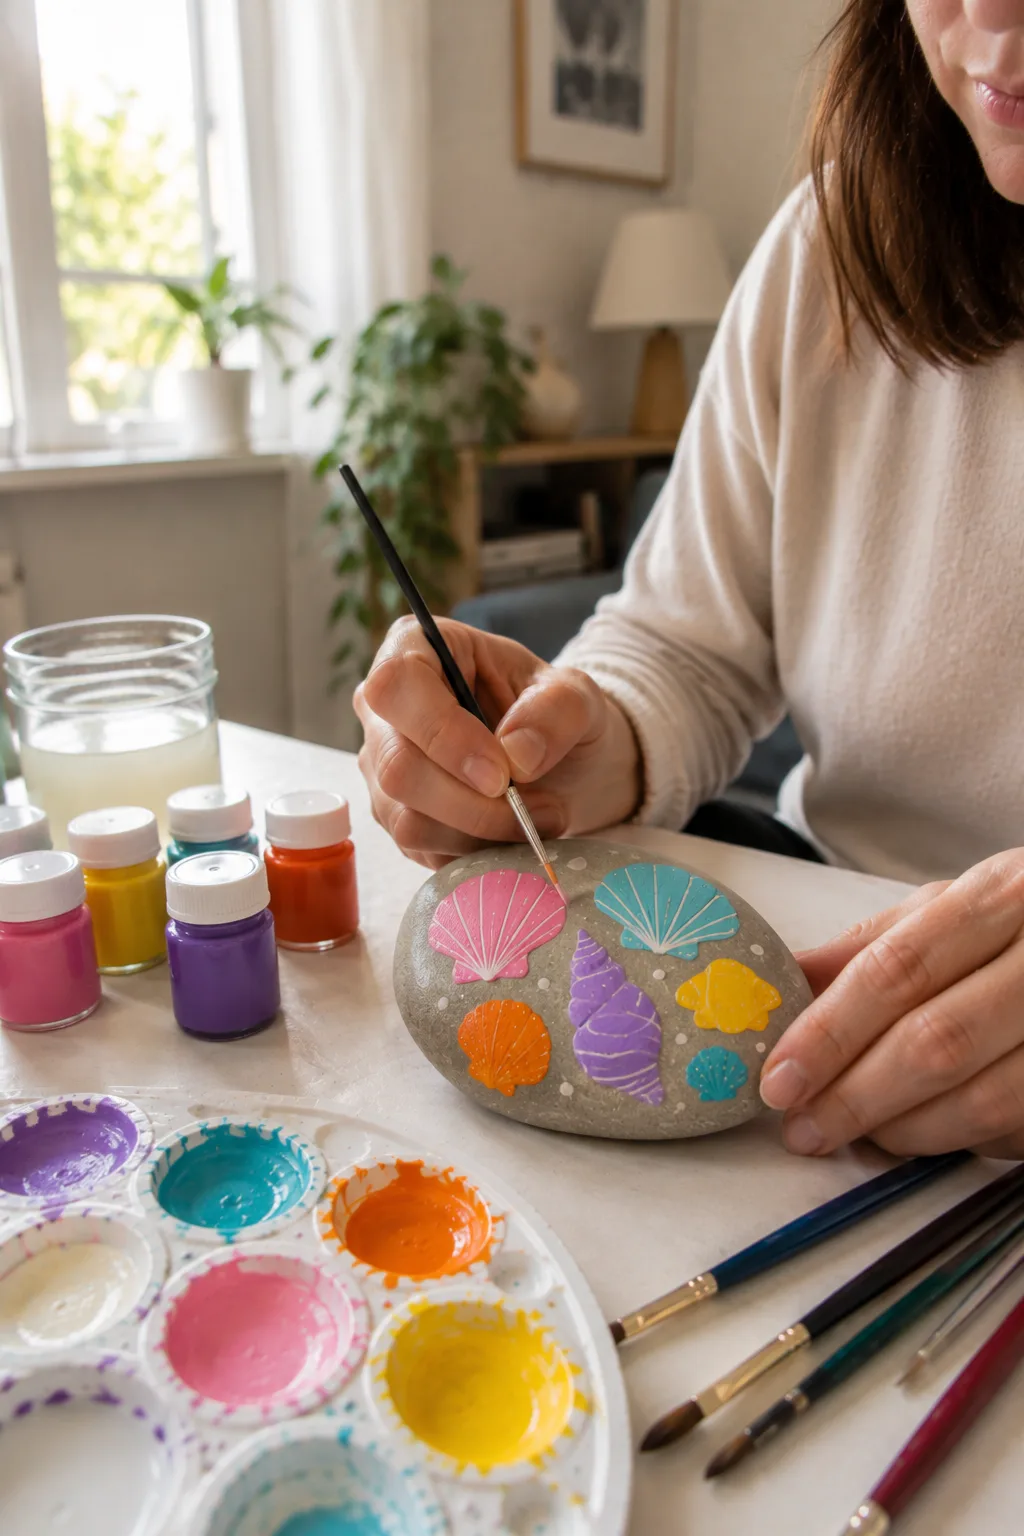
A seashell rock is a lovely way to capture the feeling of a sunny beach without needing to paint an entire ocean scene. This design combines pink, turquoise, orange, purple, and yellow shells across a natural stone, creating a colorful little collection. The simple shell shapes make it approachable for beginners while still giving you plenty of room for detail.
Start by sketching several different shell shapes across the rock, leaving a little space between each one. Paint each shell in a different bright summer color, then use a fine brush to add curved lines radiating from the center. Small white dots around the shells can add a playful finishing detail and help the individual designs stand out.
Try mixing fan-shaped shells, scallop shells, and small spiral shells rather than making every shape identical. You can also experiment with different color combinations to create a more personalized beach-inspired design. Because the pattern doesn’t need to be perfectly symmetrical, it’s a forgiving project for anyone just getting comfortable with rock painting.
Pro Tip: Use a very thin brush for the shell lines and keep your strokes light. A few delicate details can make each shell look more realistic without overcrowding the rock.
15. Paint a Playful Flip-Flop Pair With a Sunny Accent
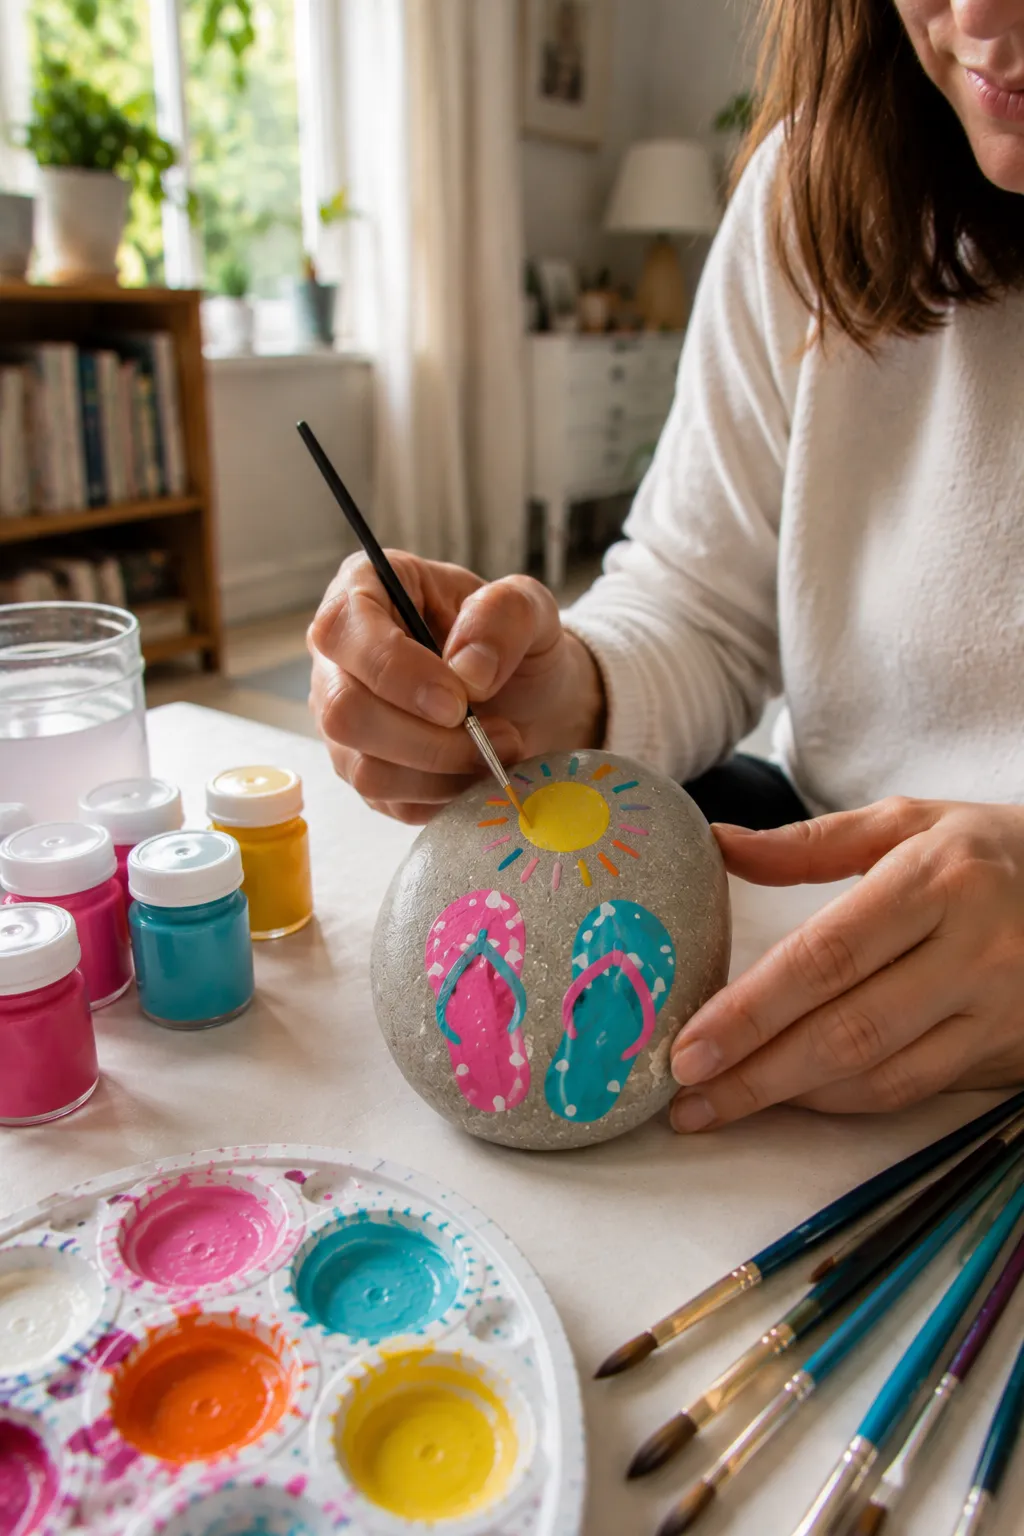
A flip-flop rock is a simple way to capture the relaxed feeling of a summer day. This design pairs bright pink and turquoise sandals with a cheerful yellow sun, creating a colorful composition that stands out against the natural stone. The simple shapes make it approachable for beginners while still giving the finished rock plenty of personality.
Start by sketching two flip-flops on the front of the rock, keeping their shapes slightly different so they look natural. Paint each sandal in a bright color, then add contrasting straps and small white dots for decoration. Above them, paint a simple yellow sun with colorful rays to bring the whole design together.
You can easily change the colors to match your own summer palette. Try coral with turquoise, purple with yellow, or orange with bright blue for a completely different look. Keep the shapes bold and the details simple, especially if you’re still getting comfortable with painting on curved stone surfaces.
Pro Tip: Paint the larger sandal shapes first and let them dry before adding the straps and dots. This makes the smaller details much easier to control and keeps the design looking crisp.
16. Create a Colorful Summer Fruit Garden on a Rock
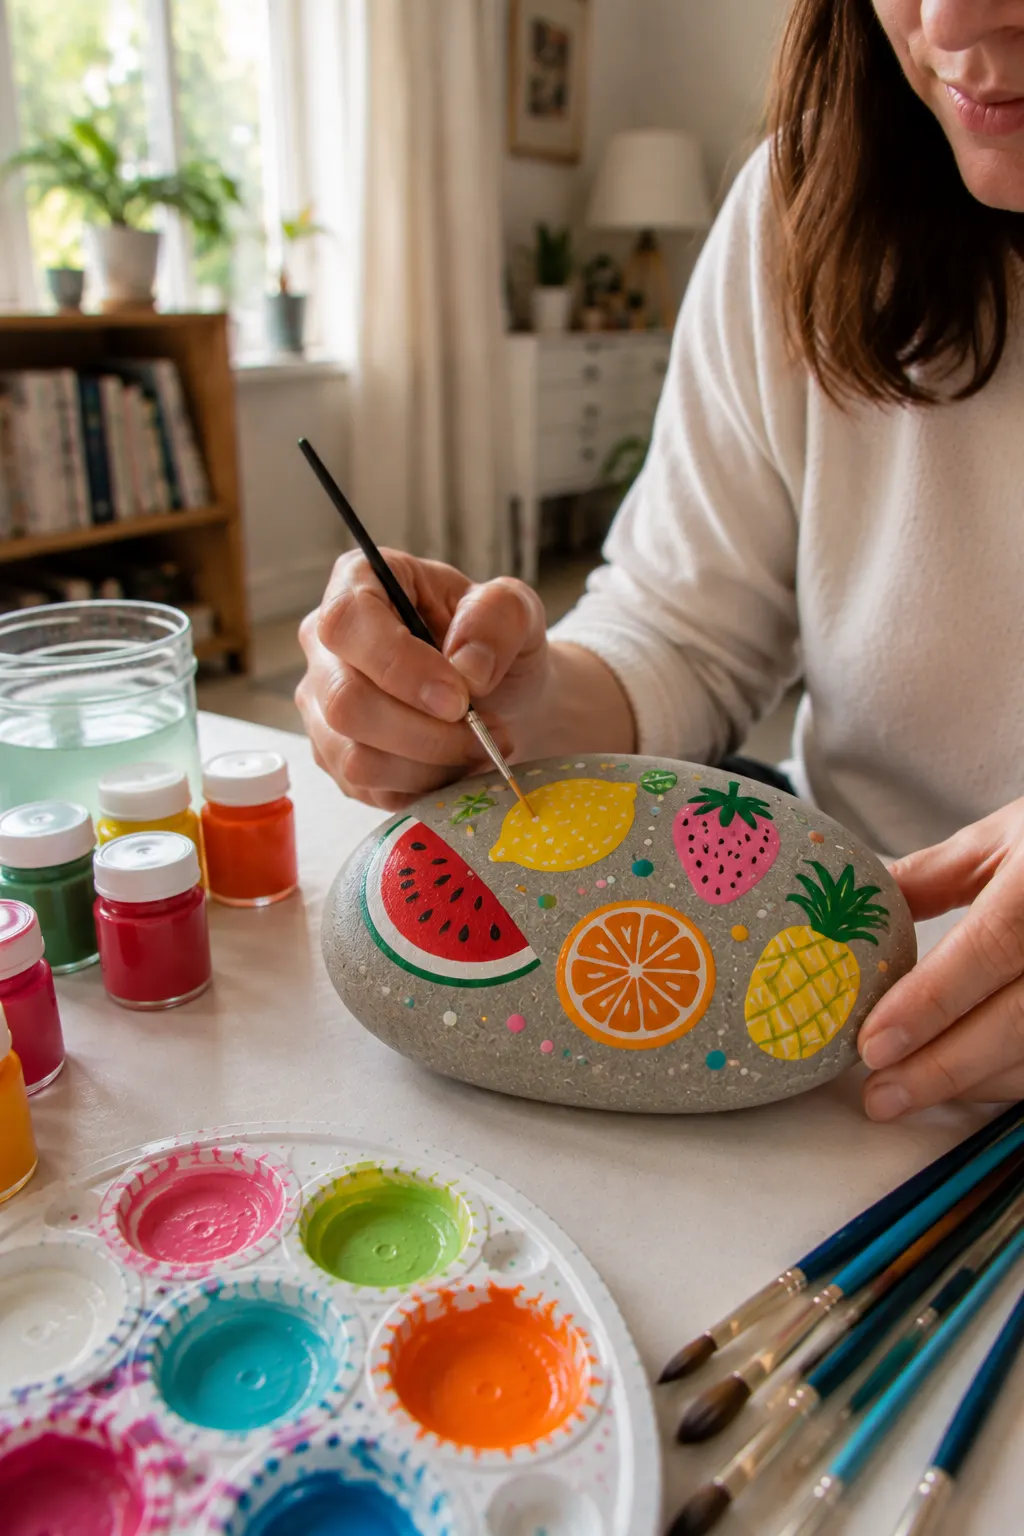
A fruit-themed rock is a fun way to bring several classic summer flavors together in one colorful design. This idea combines watermelon, lemon, strawberry, orange, and pineapple shapes across a single smooth stone, creating a cheerful collection of bright colors and simple patterns. The large, rounded rock gives each fruit enough room to remain clear and recognizable.
Start by lightly sketching the fruit shapes across the surface, leaving enough space between them so the design doesn’t feel crowded. Paint each fruit in its main color, then add the recognizable details, such as watermelon seeds, pineapple leaves, strawberry dots, orange segments, and lemon highlights. Small colorful dots scattered between the fruits can fill the remaining spaces and tie the whole composition together.
This is also a great project if you don’t want to commit to just one summer design. You can swap in cherries, peaches, blueberries, or even a small coconut to create your own fruit collection. Keep the shapes simple and use strong colors so every little fruit remains easy to see against the natural stone.
Pro Tip: Paint the larger fruits first and save the tiny decorative dots and details for the end. This makes it easier to balance the composition and prevents small elements from getting lost among the larger designs.
Bringing Your Summer Rock Painting Ideas Together
With these 16 summer rock painting ideas, you can turn simple stones into colorful little pieces of handmade art. From tropical fruit and beach-inspired designs to cheerful flowers, frozen treats, and playful summer accessories, there’s plenty of variety to keep your painting sessions interesting. You don’t need advanced artistic skills, either. A few smooth rocks, acrylic paints, and some basic brushes are enough to get started.
The best part is that you can make every design your own. Change the colors, simplify the details, combine several ideas on one rock, or create a whole collection around a summer theme. So grab your favorite stones, set up your paints, and enjoy the process. Sometimes the simplest projects are the ones that turn out to be the most fun.